This post will show you you how to put accessories into your style of fashion.I'll be showing you how to make DIY accessories.These are just simple things you can make at home,and you can do it yourself.This is for the people who know how to put your clothes together,but you dont have the accessories,or you don't know how to put them together with your outfits.
This is a DIY Ombre Abacus Wrap Bracelet.
Supplies:
Leather cord in two tones
Silver Beads
(You can find these supplies at Hobby Lobby or MJ Trim)
Total Cost: 5$ Can make up to 8 Bracelets!
Steps:
1.Measure out your cord so it wraps 3-4 times around your wrist with enough to tie a double knot in the back. (This cord is very easy to knot and un-knot on your own.)
2. String along your beads of choice (make sure they fit the cord before you buy!), a couple beads in the center rows for an abacus effect. OR sets of three are a fun look too.
3. Wrap around the wrist and tied ends!
This is a DIY Flouncy Bun Bow.
Supplies:
15×8″ piece of flouncy material. Preferably something with polyester, as it doesn’t wrinkle and can have optimal flounce.
A hot glue gun
A strip of pleather or ribbon for the center
E6000 glue (this is optional, but if you don’t want your clip to fall
off…you probably want to pick some up. This stuff HOLDS. If you use hot
glue to attach your clip it will not be as secure)
Alligator (or other) hair clips
 Steps:
 1. Add a strip of hot glue along the long WRONG side of your fabric
2. Press the ends together
3. Turn the fabric inside out, so the seam is on the inside (that’s the trick!)
4. Place your fabric with the seam up, and flatten it out a bit
5. Put some hot glue on one end, and fold it in towards the center
6. Put some hot glue down the center of the bow and fold the other side
in, add some hot glue here and there to keep things in place
7. Flip your bow over and pinch it
8. If using pleather or other fabric for the center, fold the raw edges in a hot glue them in place to get a clean edge
9. Wrap the pleather or ribbon around the center and then hot glue in place
10. Follow directions on your E6000 to hold your alligator clip in place

Supplies:
Craft wire (I used 24 gauge)
- Embroidery thread, one skein
- Scissors
- Round nosed jewelry pliers
Chain (length is up to you)
Clear nail polish (you'll use this in more than one way!)
Jump rings and jewelry clasp (optional)
Charm or tassel (optional)
Ruler (not shown)
Steps:

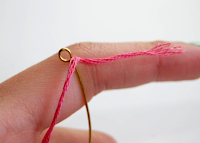
1) Cut a length of wire. About 10 or so inches should be enough. Using
the round nosed jewelry pliers, create a loop at one end of the wire.

2) Keeping the skein of thread in tact/in the packaging (this makes it easier to work with),
tightly tie the thread near the loop you just made. Triple or quadruple tie it for extra security.
3) Begin tightly wrapping the thread around the wire. I found that it
was easier to do this if you hold the entire skein of thread in one hand
while wrapping. Be sure to wrap the thread as tight as possible.

4) Continue wrapping the thread, until you've reached about 9 (or so) inches of wrapped wire.
5) Tightly triple or quadruple knot the thread.
6) Cut off the excess thread, and secure the knot with clear nail polish. Let dry.

7) Cut off the excess wire, leaving about half an inch. Use the pliers to create a loop, just like you did earlier.
8) Go back to the end that you started with, and cut off the excess thread. Secure with clear nail polish and let dry.
9) Start creating the "L" at one end. Bend the wire to the left, like
the first picture above. Wrap the wire back over to the right, around
the pliers as shown above. This will create the bottom portion of the L.
10) To make the "O", wrap the wire around the cap of the nail polish
bottle. This will help guide the general shape. Remove the bottle and
mold the "O" as you wish.
11) After you're done with the "O", make the sure the wire is bending
up, like the first picture above. Sharply bend it back down to begin the
"V". Tighten the sharp bend by squeezing it with the pliers.
12) Bend the wire back up, then horizontally. This will create the "V".

13) Wrap the wire around and over the pliers for the "e".
14) Bend the wire back up to complete the last let
15) Attach the chain to both ends. You can either use jump rings, or
simply open up the loops with the pliers. You can also attach the chain
to one end of the pendant, so that it hangs differently. It's totally up
to you.

16) Attach a charm or tassel, if you'd like.This one has a vintage gold charm.


 16) Attach a charm or tassel, if you'd like.This one has a vintage gold charm.
